Designing custom checkboxes in Python Tkinter
Write a Python program that designs a custom checkbox widget with custom icons for checked and unchecked states using Tkinter.
Sample Solution:
Python Code:
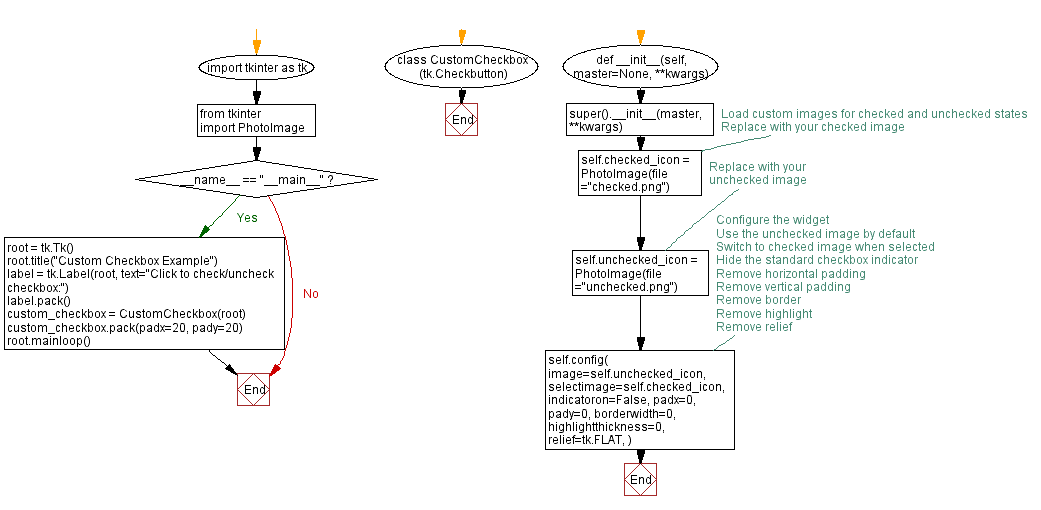
import tkinter as tk
from tkinter import PhotoImage

class CustomCheckbox(tk.Checkbutton):
    def __init__(self, master=None, **kwargs):
        super().__init__(master, **kwargs)

        # Load custom images for checked and unchecked states
        self.checked_icon = PhotoImage(file="checked.png")  # Replace with your checked image
        self.unchecked_icon = PhotoImage(file="unchecked.png")  # Replace with your unchecked image

        # Configure the widget
        self.config(
            image=self.unchecked_icon,  # Use the unchecked image by default
            selectimage=self.checked_icon,  # Switch to checked image when selected
            indicatoron=False,  # Hide the standard checkbox indicator
            padx=0,  # Remove horizontal padding
            pady=0,  # Remove vertical padding
            borderwidth=0,  # Remove border
            highlightthickness=0,  # Remove highlight
            relief=tk.FLAT,  # Remove relief
        )

if __name__ == "__main__":
    root = tk.Tk()
    root.title("Custom Checkbox Example")
    label = tk.Label(root, text="Click to check/uncheck checkbox:")
    label.pack()
    custom_checkbox = CustomCheckbox(root)
    custom_checkbox.pack(padx=20, pady=20)

    root.mainloop()
Explanation:
In the exercise above -
- Import the "tkinter" library.
- Create a custom checkbox class, "CustomCheckbox", which inherits from "tk.Checkbutton".
- Inside the "CustomCheckbox" constructor (__init__ method):
- Load custom images for checked and unchecked states.
- Configure the widget to use the unchecked image by default (image=self.unchecked_icon) and switch to the checked image when selected (selectimage=self.checked_icon).
- Set various options to customize the appearance of the checkbox, including removing padding, borders, and highlights.
- In the if name == "__main__": block, we create the main application window, root, and set its title.
- Create an instance of the "CustomCheckbox" class named "custom_checkbox" and place it in the window using "custom_checkbox.pack()".
- Finally, start the Tkinter main loop with "root.mainloop()".
Output:
Flowchart:
Go to:
Previous: Creating custom buttons with Python Tkinter.
Next: Customizing Tkinter entry Widgets with themes.
Python Code Editor:
What is the difficulty level of this exercise?
Test your Programming skills with w3resource's quiz.